Difference between revisions of "Video Debrief - How to load videos"
From Hobbyist Software
| Line 20: | Line 20: | ||
Video debrief will then transfer it into the library and start playback. | Video debrief will then transfer it into the library and start playback. | ||
| − | == | + | ==Transfer using an adaptor == |
If you're in the field, then this needs an adaptor, and a slightly indirect route. | If you're in the field, then this needs an adaptor, and a slightly indirect route. | ||
| Line 38: | Line 38: | ||
Your recently imported video should show up in the 'Import' section. | Your recently imported video should show up in the 'Import' section. | ||
| − | == | + | == Transfer with iTunes == |
# Connect your device to iTunes | # Connect your device to iTunes | ||
| Line 49: | Line 49: | ||
http://hobbyistsoftware.com/images/VideoDebrief/iTunesDrag.png | http://hobbyistsoftware.com/images/VideoDebrief/iTunesDrag.png | ||
| + | |||
| + | == Transfer with your web browser == | ||
| + | |||
| + | # Your device and computer must be connected to the same wifi network | ||
| + | # The wifi network must allow devices to communicate | ||
| + | ## Most home networks allow this automatically | ||
| + | ## Public networks frequently block communication | ||
| + | ## If communication is blocked, then you may be able to set up an ad-hoc network (personal hotspot) with one device, and connect with the other | ||
| + | # Tap on the 'open' button in Video Debrief | ||
| + | # Tap on the 'Transfer' button | ||
| + | # Open the displayed URL (address) in the web browser on your computer | ||
| + | # You should see a Video Debrief interface | ||
| + | # Drag the videos to the upload page | ||
| + | |||
| + | http://hobbyistsoftware.com/images/VideoDebrief/uploadPage.png | ||
Revision as of 15:54, 9 November 2015
There are lots of ways to load videos.
Sadly - Apple doesn't let us just connect a camera and access the videos directly, but it isn't too painful to work around those.
Contents
Dropbox or Google Drive
If you have a fast wifi connection, and saved videos, Dropbox or Google Drive are great.
Just tap on the open icon (bottom left) and pick Dropbox or Google Drive.
Videos you made with your iDevice
These are already on your device, and are easily accessed.
Just tap on the open icon, select 'Albums' and you can pick a video. Video debrief will then transfer it into the library and start playback.
Transfer using an adaptor
If you're in the field, then this needs an adaptor, and a slightly indirect route.
- Connect your camera, SD card or similar to your iDevice.
- You'll need something like one of these:
- lightning to sd card
- lightning to usb
- old connection camera kit
- third party alternatives
- Connect your camera/sd card/etc to your iDevice
- Open the Photos app
- Select 'Import' and import the relevant video.
Now you can go back to Video Debrief, pick the open button and select 'Albums'
Your recently imported video should show up in the 'Import' section.
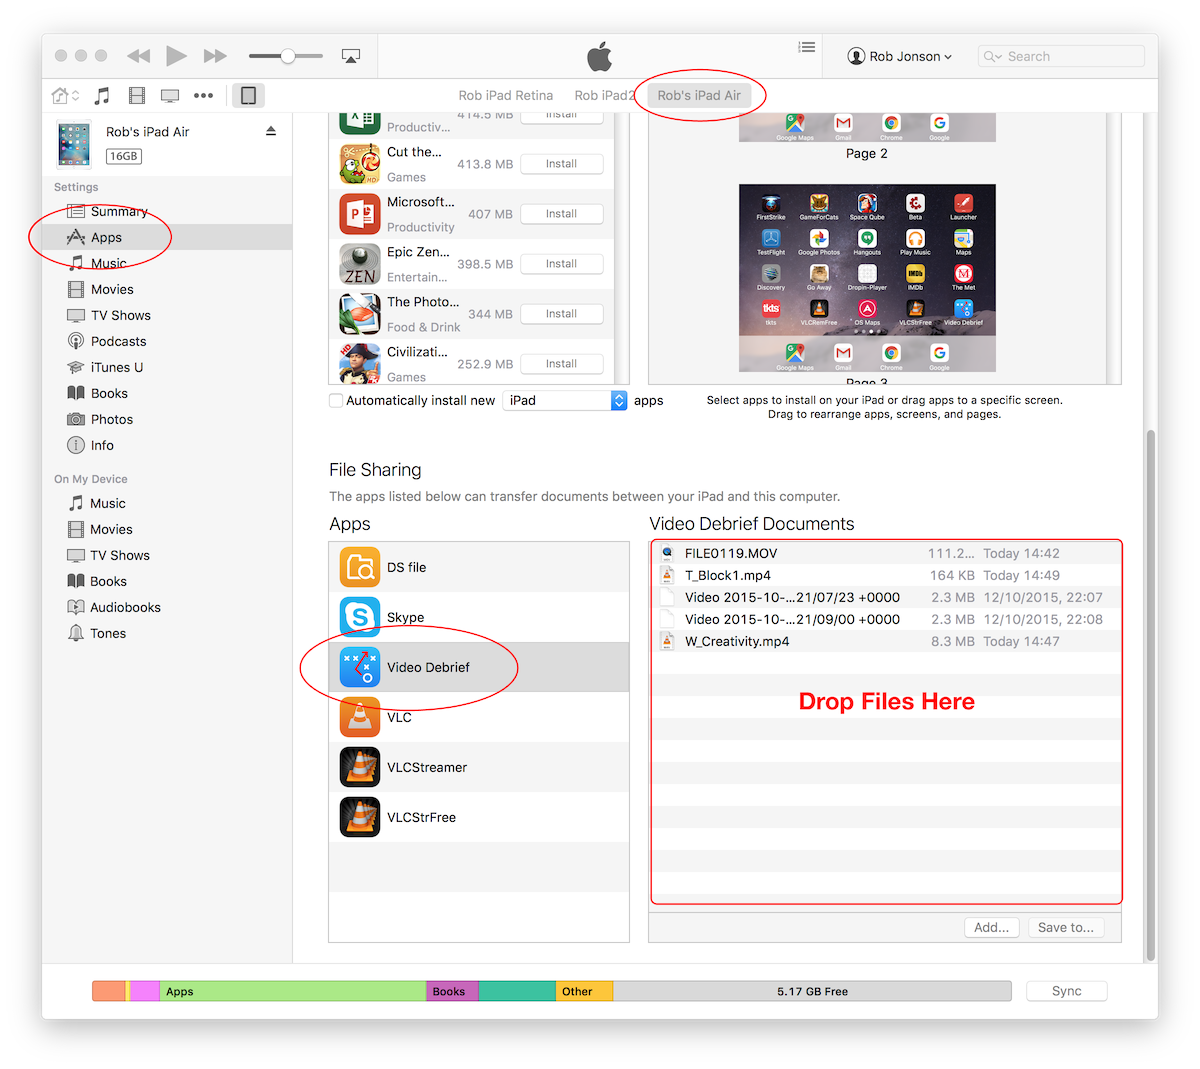
Transfer with iTunes
- Connect your device to iTunes
- Select the device
- On the left hand side, Select 'Apps'
- Scroll all the way to the bottom until you see the 'File Sharing' section
- Select 'Video Debrief'
- Drag files to the 'Documents' area.
- You will now be able to open those videos from the 'Open/Library' option.

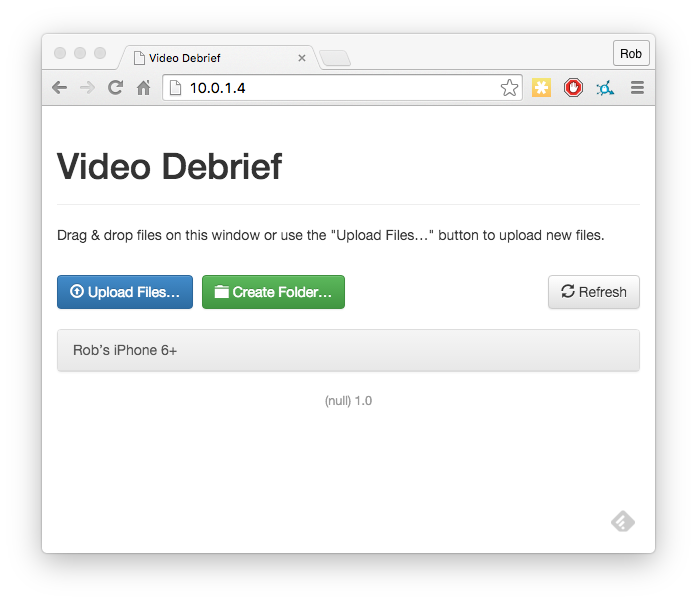
Transfer with your web browser
- Your device and computer must be connected to the same wifi network
- The wifi network must allow devices to communicate
- Most home networks allow this automatically
- Public networks frequently block communication
- If communication is blocked, then you may be able to set up an ad-hoc network (personal hotspot) with one device, and connect with the other
- Tap on the 'open' button in Video Debrief
- Tap on the 'Transfer' button
- Open the displayed URL (address) in the web browser on your computer
- You should see a Video Debrief interface
- Drag the videos to the upload page

